Water Softener Installation: Complete Guide to System Setup, Plumbing Connections, Maintenance, and Water Treatment
Hard water is a common issue in many homes and buildings.
It contains high levels of minerals such as calcium and magnesium that can leave deposits on plumbing fixtures, household appliances, and water-using equipment. A water softener helps reduce these minerals through an ion exchange process, improving water quality for everyday use.
Proper water softener installation is essential for reliable performance and efficient operation. Understanding the installation process, plumbing requirements, system components, and maintenance practices can help homeowners and property managers make informed decisions when adding a water softening system.
What Is a Water Softener?
A water softener is a water treatment system designed to reduce hardness minerals from the water supply. It replaces calcium and magnesium ions with sodium or potassium ions using a resin bed, producing softened water for household applications.
Modern water softeners are available in different sizes and capacities to meet the needs of apartments, single-family homes, and larger residential properties.
Why Install a Water Softener?
Installing a water softener offers several advantages for managing hard water throughout a property.
Common benefits include:
- Reduced mineral buildup in plumbing
- Improved water quality
- Better appliance performance
- Cleaner plumbing fixtures
- Softer-feeling water
- Consistent household water treatment
- Extended lifespan of water-using equipment
Understanding Water Hardness
Water hardness is determined by the concentration of dissolved minerals in the water supply.
Common hardness levels include:
- Soft water
- Slightly hard water
- Moderately hard water
- Hard water
- Very hard water
Testing water hardness before installation helps determine the appropriate water softener capacity.
Main Components of a Water Softener
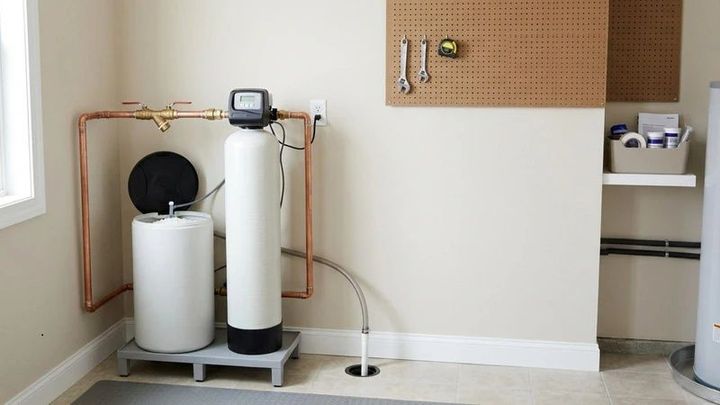
A typical water softener system consists of several important components.
Mineral Tank
The mineral tank contains the resin beads that remove hardness minerals from the water.
Resin Bed
Special resin beads capture calcium and magnesium ions during the softening process.
Brine Tank
The brine tank stores salt or potassium solution used during system regeneration.
Control Valve
The control valve manages water flow and controls regeneration cycles automatically or manually.
Bypass Valve
A bypass valve allows water to flow around the system during maintenance or servicing.
Drain Line
The drain line removes wastewater generated during the regeneration process.
Preparing for Installation
Before installing a water softener, several factors should be considered.
Evaluate Installation Space
Choose a location that provides:
- Easy plumbing access
- Nearby drain connection
- Stable floor surface
- Protection from freezing temperatures
- Adequate ventilation
- Sufficient maintenance clearance
Check Water Supply
Verify the main water supply line and identify the best location for connecting the softener.
Gather Required Tools
Common installation tools include:
- Adjustable wrench
- Pipe cutter
- Pipe fittings
- Teflon tape
- Screwdrivers
- Measuring tape
- Plumbing connectors
- Bucket and towels
Water Softener Installation Steps
Step 1: Turn Off the Water Supply
Shut off the main water supply before beginning installation.
Step 2: Drain Existing Plumbing
Open nearby faucets to relieve pressure and remove remaining water from the pipes.
Step 3: Position the Water Softener
Place the unit on a level surface near the main water supply and drain connection.
Step 4: Connect the Plumbing
Install the inlet and outlet plumbing connections according to the manufacturer's instructions.
Step 5: Install the Bypass Valve
Attach the bypass valve to simplify future maintenance and servicing.
Step 6: Connect the Drain Line
Secure the drain hose to an approved drainage location for regeneration cycles.
Step 7: Fill the Brine Tank
Add the recommended amount of water and salt before starting the system.
Step 8: Start Initial Regeneration
Follow the setup instructions to complete the first regeneration cycle and prepare the resin bed.
Plumbing Connection Considerations
Proper plumbing installation helps maintain efficient system operation.
Important considerations include:
- Correct inlet and outlet orientation
- Secure pipe connections
- Leak-free fittings
- Proper drain line routing
- Overflow protection
- Adequate water pressure
Inspect all connections before restoring the water supply.
Types of Water Softeners
Several types of water softening systems are available.
Salt-Based Water Softeners
These systems use ion exchange resin and salt for regeneration.
Salt-Free Conditioning Systems
These systems reduce scale formation without removing hardness minerals.
Dual-Tank Water Softeners
Dual-tank systems provide continuous softened water by alternating between two resin tanks.
Magnetic Water Conditioners
These systems use magnetic technology intended to influence mineral behavior within the water.
Maintenance Tips
Routine maintenance helps keep a water softener operating effectively.
Recommended practices include:
- Check salt levels regularly.
- Clean the brine tank periodically.
- Inspect plumbing connections.
- Replace resin if recommended.
- Clean the control valve when necessary.
- Monitor regeneration cycles.
- Test water hardness periodically.
Common Installation Challenges
Some installations may involve additional considerations.
Examples include:
- Limited installation space
- Low water pressure
- Incorrect plumbing connections
- Drain line restrictions
- Frozen installation areas
- Improper bypass valve installation
Careful planning can help minimize these challenges.
Choosing the Best Installation Location
For reliable performance, install the water softener:
- Near the main water supply
- Close to a suitable drain
- In a dry location
- On a stable level surface
- Where maintenance access is available
- In an area protected from extreme temperatures
Proper placement contributes to long-term system reliability.
Future Trends in Water Softener Technology
Water treatment systems continue to evolve with improved digital controls, smart monitoring, automated regeneration scheduling, leak detection, remote diagnostics, and integration with connected home technologies. These advancements help simplify operation while improving system management and monitoring.
Conclusion
Water softener installation is an effective way to improve water treatment and manage hard water in residential properties. Understanding system components, plumbing requirements, installation procedures, and maintenance practices helps ensure reliable operation and long-lasting performance. With proper installation and regular care, a water softener can become an important part of a home's overall water management system.